Animate
Day 1: Overview of HTML + CSS
We will set up our environments, go over what html and css are used for, learn the structure of an XML language, and create our first two sites.
| Lesson/Activity | Time |
|---|---|
| Lesson 1: HTML vs CSS | 20 mins |
| Activity 1: Setup | 20 mins |
| Activity 2: Hello World! | 10 mins |
| Activity 3: Poetry (optional) | 15 mins |
| Wrap Up | 5 mins |
Lesson 1: HTML vs CSS (15 mins)
Try disabling CSS and JavaScript in your browser to see what CSS, HTML, and JavaScript do. JavaScript can be disabled through browser settings in all browsers and CSS can be disabled in Firefox and Safari with the developer tools.
Some examples might seem really long or confusing! Don’t be afraid to ask questions about any of the code in the examples.
HTML/XML
HTML is an XML markup language which can be used to make titles, headers, links, images, lists, tables, and style text. XML is a general format which is used for many things, but which was invented for HTML.
XML consists of elements which have an opening tag (<tagName>) and a closing
tag (</tagName>). Elements can contain other elements and text:
What do you think the
<strong>...</strong>HTML element does?
Why do you think that all of the text is on one line instead of being on four lines?
Answer
The browser automatically removes all of the extra whitespace (spaces, tabs, and newlines) between elements and text. This is so that you can format your code nicely without having to worry about the format of your code showing up on the actual website. Later we’ll go over how to have multiple lines render in the browser!
Elements can have attributes as well:
<img src="puppy.png" alt="a happy puppy" />Write the above
<img />tag on a whiteboard or on a piece of paper. Can you label the tag name, the two attribute names, and the two attribute values?Answer
Tag name:
imgAttribute names:
src,altAttribute values:
"puppy.png","a happy puppy"
Note
We will cover what img tags do and how they work later in the lesson.
Opening/Closing Tags
A tag in HTML is what is surrounded by the angle brackets: < > (aka the greater than/less than symbols)
In the following example, <p> is the opening tag, and </p> is the closing tag. The opening tag, closing tag, and what is in between make up one HTML element. There is one HTML element in this example:
<p> <!-- opening tag -->
  Paragraph text between opening tag and closing tag
</p> <!-- closing tag -->
What is the difference between opening and closing tags?
Answer
Closing tags have a forward slash -
/- right after the opening angle bracket:</
You can type in the tag name (
p,h1, etc) and then hit Tab to automatically create an opening tag and a closing tag. Then if you hit Enter right after, it will automatically create an indented line in between the opening tag and the closing tag. Try it below!
Attributes
Attributes are used to give information about the element, such as formatting and metadata. The structure of an attribute is attribute-name="attribute-value". You can put as many attributes as you want inside of the opening tag, just make sure to put a space in between each one. The first item inside the angle brackets should always be the tag name (ex. p, h1, etc) which can then be followed by attributes (ex. class, src, href, etc). Here is an example:
It is strongly recommended to always put quotes around the attribute value! You technically don’t need to if you only use letters (a-z/A-Z), numbers (0-9), periods (.), and hyphens (-) in the attribute value, but if you don’t usually put quotes you’ll forget to when you have an attribute which contains a character that is not a letter, a number, a period, or a hyphen. This is one of the most common mistakes I see!
Style Attribute
The style attribute lets you style your HTML element with CSS to make it look more fancy. Here’s an example:
The style tag is a list of css properties and property values separated by semicolons.
You don’t need to put a semicolon at the end of the last property, but you should because otherwise you will forget to and wonder why your CSS isn’t working. Please just always put a semicolon after each css declaration.
                   ▼property value (red)
<div style="color: red;">Some red Text</div>
            ▲property (color)
            ^________^
             declaration (color: red)
CSS
CSS stands for
Cascading
Style
Sheets
CSS lets you use CSS selectors to indicate to the browser which element to apply styling within the curly brackets to. You can think of the browser copying and pasting what is in between the curly brackets into the specified element’s style= attribute.
There are a few different selectors when it comes to css:
| Selector | Description | Example |
|---|---|---|
element |
Selects all elements of the given HTML tag like the body element (<body>...</body>) for example |
body |
#id |
Selects the element with the given id like <div id="lolz">...</div> |
#lolz |
.class |
Selects all elements with the given class like <div class="fancy"> ... </div> |
.fancy |
You can either put css inline with a <style> HTML element, put CSS for a single element in the style= HTML attribute, or put CSS in a separate file with the .css file extension.
There are even more selectors than the ones above, some of which we will cover in Level 3!
The element in between the opening head tag (
<head>) on line 1 and the closing head tag (</head>) on line 3 is called a<link />tag. It is used to tell the browser which file your css rules are in. In the example below they’re located instyle.css. Go ahead and click on thestyle.csstab to see and try editing the CSS rules!
What happens if you change the font style of the
.asdfclass to beitalicizedinstead ofboldor if you change the color of.any-class-nameto be one of these colors instead ofdarkred?
Activity 1: Setup (15 mins)
Set up Replit or VS Code, depending on instructor preference. If using Replit, have students always start by deleting everything inside the index.html file and deleting the style.css and script.js files as well.
This is because Replit’s boilerplate code isn’t standard and can lead to problems like a horizontal scrollbar and a title of “replit”.
Activity 2: Hello World! (10 mins)
Introduction to HTML with a Hello World website, complete with a header and a paragraph.
You can enter an exclamation mark (!) followed by Tab to auto-complete the HTML boilerplate:
<!DOCTYPE html>
<html lang="en">
  <head>
    <meta charset="UTF-8" />
    <meta http-equiv="X-UA-Compatible" content="IE=edge" />
    <meta
      name="viewport"
      content="width=device-width, initial-scale=1.0"
    />
    <title>Document</title>
  </head>
  <body></body>
</html>
Try it below!
Make sure to change the inside of the
<title>tag.
You can put a
<style>element inside the<head>element to style your CSS.
Activity 3: Poetry (15 mins)
We are going to make two poems: first we have “Echo,” a series of h tags which get smaller, followed by any poem that has at least three lines! If the student can’t think of one, there’s always:
roses are red
violets are blue
there’s always a programmer
that’s better than you
The
<br>tag adds a line break.
Day 2
| Lesson/Activity | Time |
|---|---|
| Activity 1: Make a Logo! | 30 mins |
| Lesson 1: Adding a Meme! | 10 mins |
| Activity 2: Add your logo to a website! (Optional) | 15 mins |
| Wrap Up | 5 mins |
Activity 1: Make a Logo! (30 mins)
Make a logo using basic shapes, css, and text.
Start with this basic template, including the
xmlns="http://www.w3.org/2000/svg"attribute:<svg viewBox="0 0 100 100" xmlns="http://www.w3.org/2000/svg"> <circle cx="50" cy="50" r="50"></circle> </svg>Otherwise the browser will show something like this:
Then add text to it:
<svg viewBox="0 0 100 100" xmlns="http://www.w3.org/2000/svg">
  <circle cx="50" r="50" cy="50" style="fill: black"></circle>
  <text x="50" y="50" style="fill: white; font-size: 15px">Text</text>
</svg>Then change the font with a style tag. Note how I moved the styles for the text element that was in style= into the newly created style tag. A good rule is generally if you have more than 2 CSS properties, it's time to put the CSS into a style tag:
<svg viewBox="0 0 100 100" xmlns="http://www.w3.org/2000/svg">
  <circle cx="50" r="50" cy="50" style="fill: black"></circle>
  <text x="50" y="50">Text</text>
  <style>
    text {
      font-size: 15px;
      font-family: cursive;
      fill: white;
    }
  </style>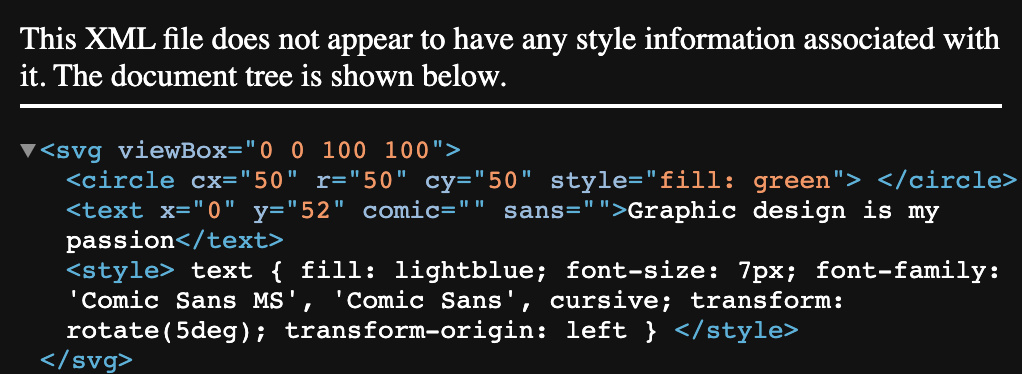
</svg>You can also use CSS transforms to rotate the text and more!
<svg viewBox="0 0 100 100" xmlns="http://www.w3.org/2000/svg">
  <circle cx="50" r="50" cy="50" style="fill: green">
  </circle>
  <text x="0" y="52">Graphic design is my passion</text>
  <style>
    text {
      fill: lightblue;
      font-size: 7px;
      font-family: 'Comic Sans MS', 'Comic Sans', cursive;
      transform: rotate(5deg);
      transform-origin: left
    }
  </style>
</svg>![]()
Lesson 1: Adding a Meme! (10 mins)
I just added an image with the <img> tag, moved the CSS to a new file, and added some CSS for the image.
<img src="/car.jpeg" alt="Car salesman standing in front of car." />Make sure your image is in the same folder as your HTML file for the image to show up! If you instead want to make an images folder and put your images in there, make sure to set the src to start with
/images/like/images/car.jpeg
Activity 2: Add your logo to a website! (15 mins)
Add an index.html file in whatever directory you have your svg file and use an <img /> tag to put that image on the html page.
Day 3
| Lesson/Activity | Time |
|---|---|
| Activity 1: Multiple Pages! | 15 mins |
| Activity 2: CSS Animations + External CSS | 30 mins |
| Activity 3: Experiment More with CSS (optional) | 10 mins |
| Wrap up | 5 mins |
Activity 1: Multiple Pages! (15 mins)
Make a multi-page website! Complete with <a> links to go in between the two pages. See line 21 in index.html and line 22 in second.html for an example of how to use the <a> tag.
Note
We use the
<a>tag instead of the<link>tag for links in between pages because in the older days of the internet the<a>tag had another use as an “anchor” to anchor one page to another. This other use of the<a>tag isn’t used today, but knowing thatastands for “anchor” might help you remember that the<a>tag is for “anchoring” pages together!
Activity 2: CSS Animations + External CSS (30 mins)
Create a simple spooky CSS animation. In style.css we animage the opacity css property
Activity 3: Experiment More with CSS (15 mins)
Look at websites around the web and when you find a design you like, inspect that website’s CSS code. (right click + Inspect)
Try to implement that design on your own in a new Replit!
Don’t be afraid to ask questions of your instructors, especially in this activity. Obviously the entire internet will have CSS that we have not covered in this class so it makes sense that you’d have questions!
Day 4
| Lesson/Activity | Time |
|---|---|
| Activity 1: Animate an SVG | 20 mins |
| Activity 2: Animate Multiple Shapes (optional) | 10 mins |
| Activity 3: Create Your Own Animation | 15 mins |
| Wrap up | 5 mins |
Activity 1: Animate an SVG (20 mins)
Start with this template:
Try changing the
x,y,width, andheightHTML attributes to see how they change the rectangle! See if you can center the rectangle in the 100 by 100 viewbox.Then add an animation to it:Answer
Set
xandyto be 25.
<svg viewBox="0 0 100 100" xmlns="http://www.w3.org/2000/svg">
  <rect id="rect" x="25" y="25" width="50" height="50"></rect>
  <style>
    @keyframes bounce {
      0% {
        y: 25;
      }

      100% {
        y: 50;
      }
    }

    #rect {
      animation: bounce 2s ease-in-out infinite alternate;
    }
  </style>
</svg>
Activity 2: Animate Multiple Shapes (10 mins)
Activity 3: Create Your Own Animation (15 mins)
Create your very own animation!
You can find more shapes and how to make them here: MDN Docs
Of course you can also use the two shapes we already learned, rect and circle, to do plenty of very very awesome animations.
Day 5:
| Lesson/Activity | Time |
|---|---|
| Activity 1: Make Two More Animations | 30 mins |
| Activity 2: Make a Homepage | 15 mins |
| Activity 3: Present (15 mins) | 15 mins |
Activity 1: Make Two More Animations (30 mins)
Activity 2: Make a Homepage (15 mins)
Activity 3: Present (15 mins)
Present your projects with the class!